
Recording and live broadcasting
How you use video in your teaching depends on the content and what you want to achieve through the learning activity.
If you need a flexible solution, where the student is not tied to a specific place or time, a pre-recorded video is preferable. If you see a need for direct interaction, such as allowing students to ask questions or engage in group discussions, live video is a better solution.
Pre-recorded video
There are several ways to record your video and share it in your course.
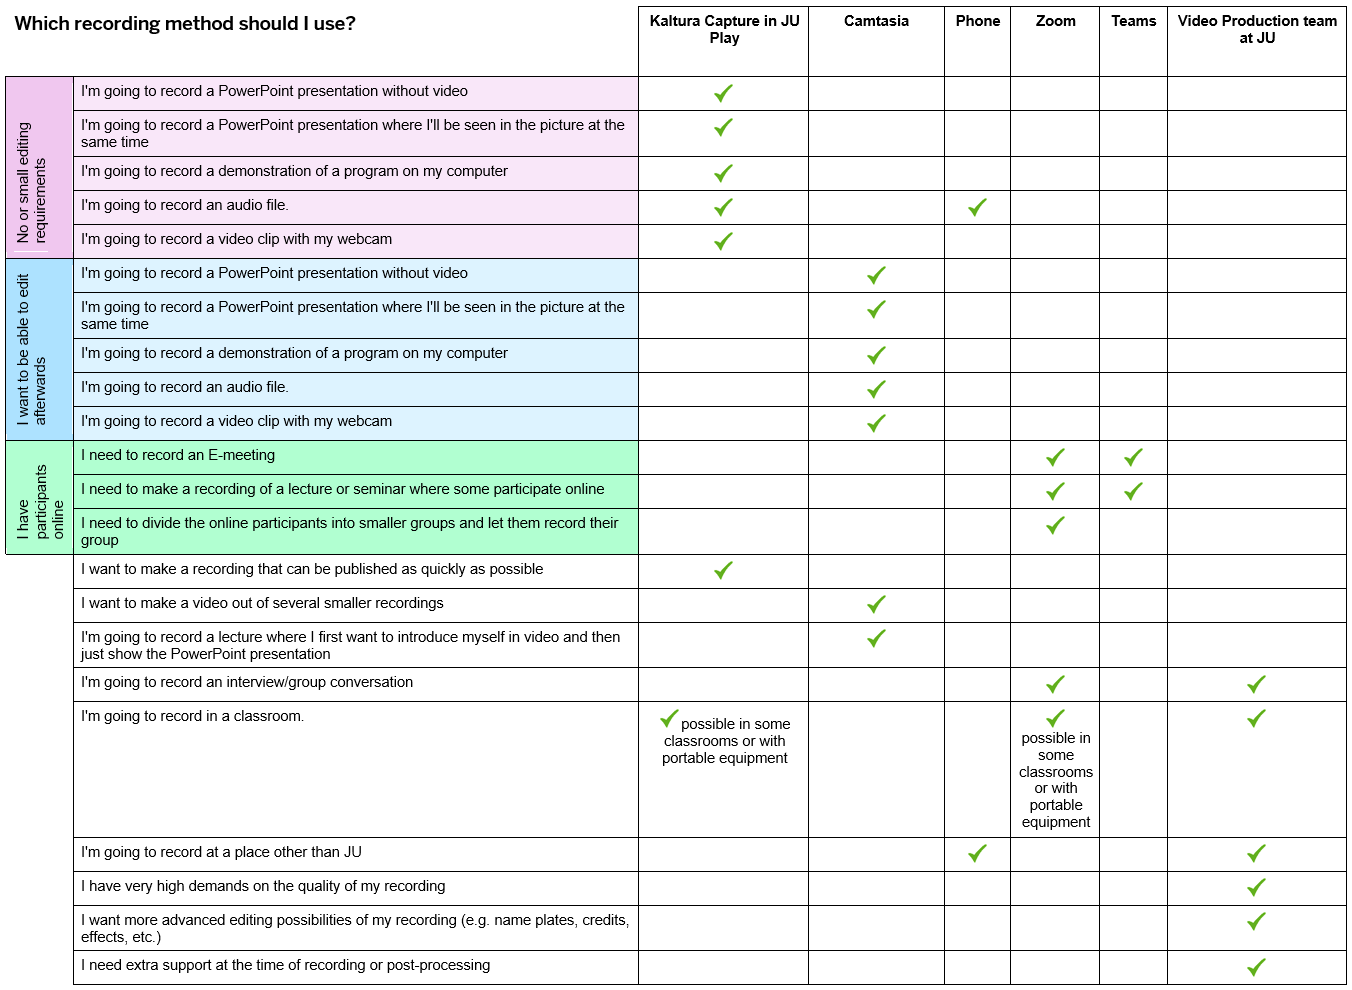
Choose the tool by thinking about what suits you, but also which option is best able to engage students and contribute to the learning outcomes.
The tools available at JU are described below.
PowerPoint
Record a presentation in PowerPoint
- Written guide for recording in PowerPoint External link, opens in new window.
- Video guide for recording in PowerPoint External link, opens in new window.
- For Mac users: Video guide for recording with Keynote External link, opens in new window. (English)
Zoom
You can use Zoom to record your webcam and screen. You can learn more about this in the Live lectures and seminars section.
Kaltura - JU Play
Kaltura is a recording tool that is linked to your JU Play account. The big advantage of it is that you can upload the video directly after recording to JU Play without exporting a video file.
You can find the software at play.ju.se External link, opens in new window..
Camtasia
This is the most advanced screen recording program you can use on JU. Here you have more recording options and settings. You can also edit your video in Camtasia before exporting it as a video file.
- Video guide for using Camtasia (English)
Smartphone
If you have a smartphone, you are already a video producer, you just don't know it yet. The modern cell phone you carry around in your pocket all day has all the tools you need to create high-quality videos for the web, and even television broadcasts.
Here are two things to consider before you start filming with your phone.
- Hold your phone horizontally. A common mistake many people make when filming with their phone is to hold it vertically, which results in the video being in portrait mode. This can be a problem if you e.g. upload the video in JU-play, which has a horizontal widescreen format, and you then get black edges on your video.
- A smartphone has a built-in microphone that maintains relatively high quality of the recorded sound. But keep in mind that the further away you are from the sound source, the more the sound deteriorates. If you are going to record an interview with the camera on your phone, it can be useful to have an external microphone or recorder that picks up clear speech sound.
Live lectures and seminars
Zoom is a tool for digital meetings
Zoom is a tool for digital meetings. It can be used for group work, tutorials, video meetings or lectures. Here you can send image and sound, share screen, create so-called "breakout rooms" for group work or discussions and you can also record the meetings.
Zoom is available to all JU staff and students.
Recently, there has been a phenomenon called "Zoom bombings". This is when uninvited participants show up in Zoom rooms to sabotage meetings, lectures or ongoing examinations.
Teams
Microsoft Teams is a platform that combines chat, audio/video meetings and simplifies collaboration in documents and other applications. In Teams, you can also have a pure video meeting with screen sharing, recording and dividing participants into breakout rooms. Teams is part of Office 365 and is available to all JU staff and students.
Upload video in JU Play
To share your video in Canvas, you can upload it to the JU media player JU Play. Once that is done, you can then share the link to the video.
JU Play is "locked", which means that a video that is uploaded cannot be downloaded by the viewer, but only played. To further restrict access to your recorded material externally, you can embed the video in Canvas. Then only students and teachers in the course can see it.
Tips for recording
There are different ways to get your learning across in a video. These tips might help you think more in pictures and make the most of the medium.
Record in small chunks
Instead of having a full hour of video in a row, break it down into smaller parts of 5-10 minutes. This makes it easier for the student to go back and rewatch certain parts. This is also technically easier for you, as larger video files can sometimes cause problems with space on your computer, for example.
Show don't tell
The webcam can show more than just your face. Show things on camera that you talk about in your lecture. This way you take advantage of the medium and get the student more focused on what you are saying.
Recording environment
Ideally, use a controlled environment when recording. A place where you won't be disturbed by different sounds, people or other things that might appear in the picture. But you can also choose the environment according to what your recording is about. For example, you could record a lecture on biology in a forest.
Recording in another location
If you can't take your students on a study visit - take the study visit to the student. Record with your phone at a workplace, for example, and share the video with the students.
For help and support with recording and live broadcasting, please contact Joakim Staf.

- Lecturer in Media and Communications
- School of Education and Communication
- joakim.staf@ju.se
- +46 36-10 1466